Replacing your car’s instrument cluster can seem daunting, but it’s a straightforward DIY task if you understand the steps involved. Your instrument cluster is essential for monitoring the car’s speed, engine revolutions, fuel levels, and warning lights. When these features fail or display erratic behavior, it’s time to consider a replacement. In this guide, I’ll walk you through the process step-by-step, offering practical tips to ensure a smooth automotive repair.
Key Takeaways :
- The instrument cluster displays vital information such as speed, RPM, and warning lights.
- Common symptoms of a failing cluster include flickering gauges, non-functioning lights, and stuck needles.
- Replacing the cluster usually takes about 1 to 1.5 hours with basic tools like a socket set.
- Ensure the replacement cluster matches your vehicle’s model and verify all wiring connectors before installation.
- After replacement, always test the cluster’s functionality by checking dashboard lights and performing a short drive.
Understanding the Role and Symptoms of a Faulty Instrument Cluster in Vehicle Maintenance
The instrument cluster is the dashboard’s nerve center, continuously informing you about your car’s performance and alerting you to potential issues. It houses gauges like the speedometer, tachometer, fuel gauge, and a suite of warning indicators such as oil pressure and battery status. When this unit malfunctions, your ability to monitor critical systems is compromised, potentially leading to unsafe driving conditions.
Common symptoms of instrument cluster failure are immediately noticeable. For example, the speedometer might freeze or jump erratically, or the needles on gauges like the fuel level and RPM stay fixed despite changes in conditions. Warning lights such as the hazard indicator or high beam notification might stop functioning or flicker unpredictably. In some cases, the entire cluster may go blank.
Manufacturers design instrument clusters with a limited lifespan, primarily due to wear on internal electronics and mechanical components. It’s crucial to differentiate between cluster failure and simple issues like blown bulbs. Sometimes replacing bulbs inside the cluster can restore functionality without needing a full replacement. However, when multiple indicators fail or dials get stuck, replacing the instrument cluster is the best course of action.
In 2026, reliability remains a key concern for models like BMW’s X5 and X6, which have reported instrument cluster issues that drivers need to watch out for. You can find detailed reports on BMW X5 common problems and BMW X6 common problems to understand specific nuances related to these vehicles.
Ignoring warning signs from a failing cluster can lead to further complications. For instance, failing to notice low fuel or overheating indicators can cause severe engine damage or leave you stranded. Hence, understanding these symptoms early is essential for timely intervention and vehicle maintenance.

Tools and Preparations Needed for a Successful Car Instrument Cluster Replacement
Before diving into the replacement process, preparing your workspace and gathering the correct tools is vital to avoid unnecessary delays or damage. Generally, a standard socket set is essential, along with screwdrivers, plastic pry tools for the dashboard trim, and gloves to protect your hands and avoid static discharge.
Start by parking your car on flat ground, engaging the handbrake to secure it. This ensures your safety and prevents any vehicle movement during the operation. In some vehicles, there are specific prerequisites to accessing the instrument cluster area. For example, you may need to position the steering wheel at a particular angle or put the transmission in neutral or park.
Always disconnect the vehicle’s battery before any work on the dashboard to prevent electrical short circuits or accidental airbag deployment. Waiting at least 10 minutes after disconnection ensures residual electrical charge has dissipated, reducing the risk further.
Organizing your workspace helps maintain a steady workflow. Keep all screws, bolts, and clips in labeled containers. This simplifies reassembly and helps avoid misplaced parts, a common cause of problems when reinstalling the cluster.
For those working on popular models or looking for specific cluster types, detailed guides such as the Peugeot 207 issues resource can provide model-specific nuances that save time and reduce frustration during cluster replacement.
Checklist of essential tools and preparations:
- Socket set (varied sizes)
- Phillips and flat-head screwdrivers
- Plastic trim removal tools
- Gloves for protection
- Battery disconnect tool or wrench
- Containers for screws and bolts
Having these tools at hand is fundamental for a smooth, damage-free cluster replacement. It also helps you avoid emergency stops that can increase overall repair time.

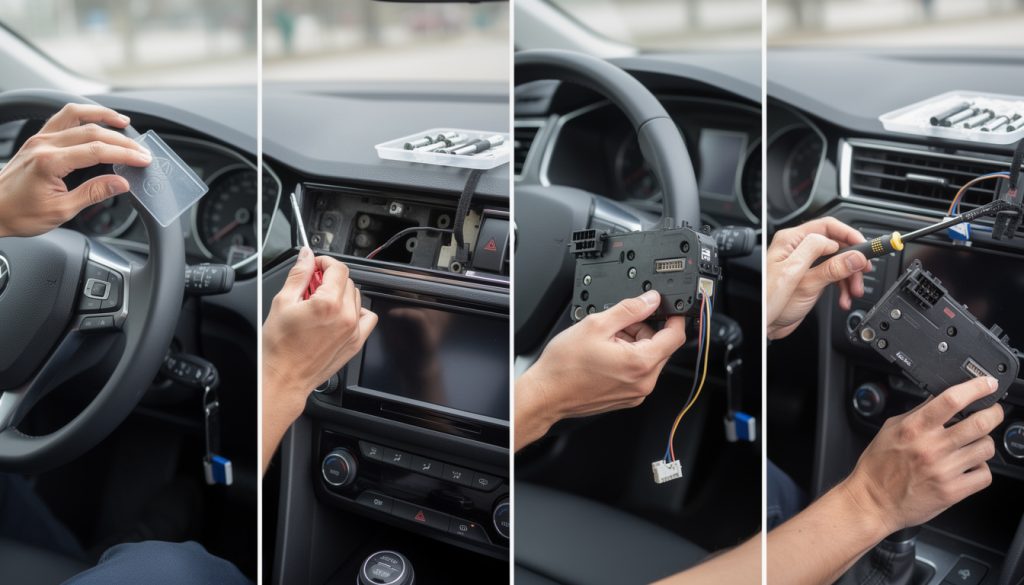
Step-by-Step Process to Remove the Old Instrument Cluster Safely and Efficiently
Replacing the instrument cluster involves removing several components carefully to avoid damage to sensitive connectors and dashboard trim. Here’s a precise breakdown of how to do this effectively:
- Remove the instrument cluster bezel: Use a plastic pry tool to gently disengage the clips holding the trim around the cluster. Avoid metal tools here to prevent scratching or breaking the plastic.
- Unfasten mounting bolts: Locate the bolts securing the instrument cluster. Depending on your vehicle, these might be four to six bolts placed at key attachment points. Use the appropriate socket to unscrew them.
- Gently pull the cluster forward: With bolts removed, carefully pull the cluster toward you until you can access the wiring harnesses behind it.
- Disconnect wiring connectors: Identify the main wiring harness connected to the cluster. There will be locking clips or tabs; release these gently before unplugging the connectors. Forcibly pulling can cause electrical damage.
💡 Expert Tip: Take pictures before disconnecting the wiring to ensure you can reconnect everything correctly during installation. This simple step can save you from costly mistakes and troubleshooting later.
During disassembly, keep an eye out for any damaged clips or broken plastic parts; replacing these as needed prevents rattles and loose fittings after installation.
This process can typically be completed within 30 minutes, depending on the vehicle make and your familiarity with the instruments. Some vehicles have more complex setups with additional sensors or airbag wiring near the cluster, which demands extra attention to detail and caution.
Installing the New Instrument Cluster: Checks and Best Practices for a Reliable Replacement
Once you’ve removed the old cluster, it’s time to focus on installing the new one correctly. The first and most critical step is to verify that the replacement part exactly matches your car’s make, model, and production year. Even small differences in wiring connectors or dash design can lead to incompatibility issues.
Place the new cluster near the wiring harness and compare all connector ports carefully. If the connectors don’t align perfectly, do not force the connection; seek the correct part or adapter. Secure wiring connections ensure accurate data transmission from your vehicle’s sensors to the display.
After confirming compatibility, connect the wiring harness and secure the instrument cluster with the bolts removed earlier. Be sure to tighten them evenly to prevent uneven pressure on the cluster housing.
Reinstall the dashboard bezel by gently pressing it back into place, making sure all retaining clips engage securely. Avoid heavy force, as this can crack delicate plastic parts.
Before finalizing the installation, reconnect your battery and start the engine to perform a thorough check. Look for accurate gauge movement, functioning warning lights, and operational indicators like turn signals and high beam notifications.
If you detect any malfunction, double-check all electrical connectors and mounting points. Sometimes, improper connections or pinched wires lead to cluster failure.
| Step | Action | Estimated Time | Tools Required |
|---|---|---|---|
| 1 | Prepare vehicle and remove dashboard trim | 15 minutes | Plastic pry tools, screwdrivers |
| 2 | Unbolt and disconnect old instrument cluster | 20 minutes | Socket set, gloves |
| 3 | Install new cluster and reconnect wiring | 20 minutes | Socket set |
| 4 | Test functionality and reassemble dashboard | 15 minutes | No special tools required |
For detailed model-specific guidance or troubleshooting, you might find valuable insights on forums or automotive reports, such as common issues with the Audi TT. These sources can offer tips on quirks and fixes related to your specific vehicle’s instrument cluster.

Maintaining Your Dashboard and Instrument Cluster Post-Replacement for Longevity
Replacing the instrument cluster isn’t just a fix—it’s an opportunity to ensure long-term reliability of your dashboard components. Regular maintenance can extend the life of your new instrument cluster significantly.
Start by keeping the dashboard clean and free of dust, which can accumulate behind vents and potentially interfere with electronic components. Use soft microfiber cloths and avoid harsh chemicals that could degrade plastic or damage wiring.
Be mindful of electrical system health as well. Ensure your vehicle battery is in good condition and terminals are clean and tightly connected, as voltage fluctuations can adversely affect sensitive dashboard electronics.
Regularly check for any signs of wear or malfunction in your gauges and warning lights. Early detection helps you address issues before they become serious. If you notice flickering lights or erratic gauge behavior, re-inspect all connections, or consult a professional.
- Keep the dashboard dust-free to prevent damage to sensitive sensors and circuits.
- Regularly inspect your car’s battery health to maintain stable power supply.
- Avoid leaving your car exposed to harsh sunlight for long periods to protect dashboard plastics.
- Check for warning lights frequently and don’t ignore unusual readings.
💡 Expert Tip: Investing in a dashboard cover can reduce UV exposure and heat buildup, significantly prolonging your instrument cluster’s lifespan.
Good upkeep after replacement avoids repeat repairs, saving significant sums in the long run. The average replacement cost for an instrument cluster can range from $150 to $600 depending on the vehicle, so preserving your investment through proper care is key.
How can I tell if my instrument cluster needs replacement?
Common signs include non-moving gauges, flickering or unlit warning lights, and display malfunctions. If multiple issues occur simultaneously, replacement is likely needed.
Is it safe for a non-professional to replace an instrument cluster?
Yes, as long as you follow safety precautions like disconnecting the battery and have the right tools. The job is considered moderately easy for DIY enthusiasts.
Can I repair the instrument cluster instead of replacing it?
In some cases, blown bulbs or minor electrical faults can be repaired, but full replacement is usually more reliable and prevents recurring problems.
How long does the instrument cluster replacement take?
Typically, the procedure takes between one hour to one and a half hours, depending on your experience and vehicle model.
Will the new instrument cluster require programming?
Some modern vehicles may require software programming after installation. Consult your vehicle’s manual or a professional for these cases.