Replacing a car wing may seem daunting at first, but with the right guidance and tools, it can be a straightforward DIY task. Whether your wing is dented from a minor accident or corroded beyond repair, learning to perform a car wing replacement is invaluable for anyone interested in auto body repair and car maintenance tips. This step-by-step guide from the breakerlink blog will walk you through the entire process, helping you save money and avoid unnecessary trips to the body shop.
Key Takeaways :
- Car wing replacement is achievable with basic mechanical skills and standard tools.
- Preparation includes securing the vehicle safely and loosening wheel nuts before jacking up.
- The wing is attached with bolts found in the engine bay, door frame, bumper, and behind the door hinge.
- Removing the bumper partially is essential for access to hidden fixings.
- Reinstallation requires methodical tightening of bolts and verifying with a test drive for stability.
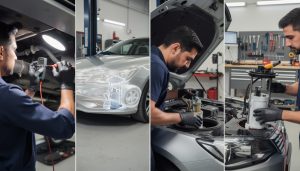
Essential Tools and Safety Checks for Car Wing Replacement
Before tackling the removal and installation of your car’s wing, it’s necessary to gather all tools and prepare the workspace correctly. For a smooth DIY car repair, I recommend having a socket set, Philips screwdriver, spanner, trolley jack, and axle stands ready. These tools provide the leverage and access needed to undo and redo bolts effectively.
Safety must come first. Always ensure your car is parked on a flat, dry surface with the handbrake firmly engaged to prevent slipping. Loosening the front wheel nuts is easier before lifting the car, so do this while the vehicle is still on the ground. Raising the vehicle securely with a trolley jack and positioning axle stands under reinforced points will give you the stability needed to work safely.
Doing this work carelessly risks injury and damage not just to the wing but to surrounding body components. In addition, knowing the position of each bolt and fastening point in advance reduces the chances of stripping screws or losing hardware. This meticulous preparation is part of effective car wing installation and will facilitate the later reassembly process.
Bear in mind that certain car models might have slightly different wing attachment locations or extra clips, especially depending on the year or manufacturer. Cross-reference your vehicle’s service manual, or check reputable resources for specific diagrams. Resources like the replace car door guide can provide additional insight into similar body panel workings.
💡 Expert Tip: Always keep removed bolts and screws organized in labeled containers to avoid confusion during reassembly. This simple habit can save hours and prevent unnecessary frustrations.
Step 1: Removing the Front Wheel for Access and Safety
The initial step in the wing replacement process involves wheel removal, which is essential to access bolts and parts around the wheel arch. This phase directly affects how safely and comfortably you can work on the wing.
Start by loosening the wheel nuts while the car rests securely on the ground. This is key because once the vehicle is raised, it becomes challenging to apply enough torque to loosen stubborn nuts. After loosening, use the trolley jack to lift the car steadily from the recommended jacking point, then place axle stands under the chassis for solid support.
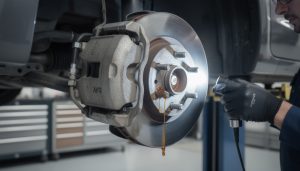
Once the vehicle is securely elevated, completely unscrew the wheel nuts and remove the wheel. Carefully position the wheel aside, ensuring it’s not in the way or unstable. The exposed wheel arch now grants access to key bolts that fasten the wing to the car’s frame.
For anyone new to DIY car repair, this step also offers a good opportunity to check other crucial maintenance points such as brake pads and suspension condition. Addressing these while solving the wing issue could save time and future repairs.
- Loosen wheel nuts with the car on the ground to avoid wheel spinning.
- Use a trolley jack and properly rated axle stands for safety.
- Remove the wheel and set it aside on a non-slip surface.
- Inspect brake and suspension components while the wheel is removed.
Successful removal here allows you to proceed confidently with the next steps of car wing removal without risking damage to surrounding parts or yourself.
Step 2: Detaching the Damaged Wing: Bolts, Clips, and Panels
With the wheel removed, you can now focus on the mechanical unfastening of the damaged wing. The wing is typically fixed with several bolts distributed along the bodywork, including inside the engine bay, the door frame, and behind the door hinge.
Begin by identifying and removing all visible bolts along the wing’s edge in the engine bay. These will often require a good-quality socket set due to tight fastening and possible corrosion. Don’t rush this step—removing these bolts methodically prevents stripping the heads or damaging the surrounding paint.
Next, locate the bolt hidden behind the door hinge. This one is crucial for proper wing detachment but can be tricky to access. Using a socket set here is recommended since a spanner might not fit comfortably. Watch for any bolts underneath the door sill as well, as some vehicles secure the wing at multiple levels to improve structural integrity.
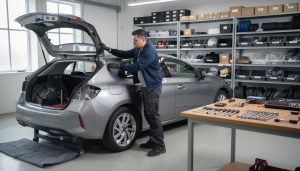
Removing the bumper partially is the subsequent step. Two bolts holding the wing are found behind the bumper, typically accessible by detaching the bumper from the wheel arch and undoing retaining clips. Gently edging the bumper out doesn’t require full removal but creates necessary space for bolt access.
Once all bolts and screws are loosened, the wing will still resist due to glue or sealant commonly applied during manufacturing. Apply measured force, using careful leverage if needed, to disengage it from the body. Remember to disconnect the side indicator and unplug the wiring harness before fully removing the wing to avoid electrical damage.
- Remove engine bay bolts with a socket set for secure access.
- Access the door hinge bolt carefully with a socket set.
- Detach bumper clips and bolts to expose hidden fixings.
- Gently pull wing apart, detaching glue or sealant.
- Disconnect the side indicator wiring before full removal.
This approach minimizes risk of damage to other body parts and makes installation of the replacement wing easier.
Step 3: Installing the New Car Wing with Proper Alignment and Fixings
After successful removal, it’s time to fit the replacement wing, which is simpler now that you understand all attachment points. Carefully aligning the new wing is crucial: it must fit flush with adjacent panels for a seamless look and aerodynamic integrity.
Start by ensuring all the bolts you previously removed are available and in good condition. Begin installation by connecting the side indicator wiring harness first. This avoids forcing connections when the wing is partially installed. Next, position the wing under the bumper and secure it temporarily. Pull the bumper back into position if previously shifted for wing removal.
Secure the bolts in the door frame next. These bolts are important for structural hold and alignment, so tighten them progressively to ensure the wing sits correctly. Finish by screwing in the bolts in the engine bay, verifying every bolt is snug but not overly tightened to avoid strip damage.
A final visual inspection should affirm that the wing edges align smoothly with the bonnet and door. Test by gently trying to shift the wing; it should feel entirely fixed without play. The car now needs a short test drive to catch any rattles or vibrations indicating loose fastenings.
| Step | Bolts Location | Purpose | Recommended Tool |
|---|---|---|---|
| 1 | Engine bay | Main wing fastening points | Socket set |
| 2 | Behind door hinge | Structural stability | Socket set |
| 3 | Under door sill (optional) | Additional reinforcement | Socket or screwdriver |
| 4 | Behind bumper | Hidden fixings | Screwdriver & socket set |
💡 Expert Tip: After installation, apply anti-corrosion spray on visible bolts to prevent rust, especially if you live in wet or coastal areas.
Common Issues During Car Wing Replacement and How to Avoid Them
While replacing a vehicle body part such as a car wing might seem straightforward, common pitfalls can prolong the work or cause damage. Being aware of these issues and their solutions will improve your repair efficiency and finish quality.
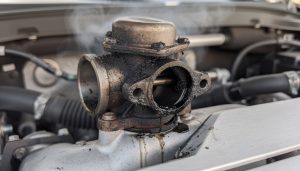
A frequent problem is rusted or seized bolts, especially on older cars. These bolts can be stubborn and prone to snapping if forced too harshly. To avoid this, apply penetrating oil in advance and allow it time to work. Using the correct-sized tools and avoiding worn sockets prevents rounding bolt heads.
Another common issue is misalignment during reinstallation, leading to uneven panel gaps or stress points that can cause cracking. Always start tightening bolts gradually and alternate between fastening points. This technique ensures even pressure distribution and proper seating of the wing.
Unplugging and reconnecting electrical components such as side indicators must be done with care to prevent wiring damage. If you encounter resistance, double-check that the connector is fully disengaged before attempting removal. Damaged wiring can lead to additional repair costs and vehicle safety issues.
As a precaution, always check for any signs of damage to adjacent body panels or sealing strips before installing the new wing. Reusing damaged seals risks water ingress and rust development under the wing, which defeats the purpose of replacement.
- Apply penetrating oil to rusted bolts well ahead of removal.
- Tighten bolts evenly to avoid panel misalignment.
- Handle electrical connectors carefully to avoid wiring issues.
- Inspect surrounding seals and panels for damage or wear.
- Use correct tools for bolt sizes to prevent damage.
For more resources on related repairs, you can also consult guides like car exhaust back box replacement or replace rear bumper, which share similar troubleshooting principles in vehicle bodywork.
Can I replace a car wing myself without professional help?
Yes, with basic mechanical skills and proper tools, anyone can replace a car wing. It does not require engine work but attention to detail and safety precautions.
What tools do I need for a car wing replacement?
A socket set, Philips screwdriver, spanner, trolley jack, and axle stands are essential for safely removing and installing the wing.
How much does it typically cost to replace a car wing?
The cost depends on the wing type and model, but the DIY approach mainly costs for the wing part and any consumables, often saving 50% compared to professional panel beating.
What common problems occur when removing a wing?
Seized bolts, misalignment, and damaged wiring connectors are frequent challenges. Applying penetrating oil and careful handling mitigate these risks.
Is it necessary to remove the bumper to replace the wing?
Yes, partial detachment of the bumper is usually needed to access hidden bolts securing the wing behind it.